2 (8-ounce) boneless, skinless chicken breasts, cut in half lengthwise
Cooking Equipment
Whisk
Liquid measuring cupInstant-read
thermometer
Large plate
12-inch skillet with lid
Rubber spatula
Tongs
Oven mitts
2 forks
Soupspoon
What to do:
In liquid measuring cup, whisk together ketchup, molasses, mustard, vinegar, and Worcestershire sauce. Set aside.
In 12-inch skillet, heat oil over medium heat for 1 minute (oil should be hot but not smoking).
Add shallot, chili powder, and salt. Cook, stirring occasionally with rubber spatula, until shallot is softened, about 3 minutes. Stir in ketchup mixture, scraping up any browned bits.
Use tongs to carefully place chicken in skillet. Bring mixture to boil.
Reduce heat to medium-low, cover, and simmer for 4 minutes.
Use oven mitts to remove lid. Use clean tongs to flip chicken pieces over.
Cover and simmer until chicken registers 165 degrees on instant-read thermometer, 4 to 6 minutes. Turn off heat. Slide skillet to cool burner.
Use clean tongs to transfer chicken to large plate.
Let cool slightly, then use 2 forks to shred chicken into bite-size pieces Return shredded chicken to skillet and stir to coat with sauce.
Heat chicken over medium heat until warmed through, 1 to 2 minutes. Turn off heat.
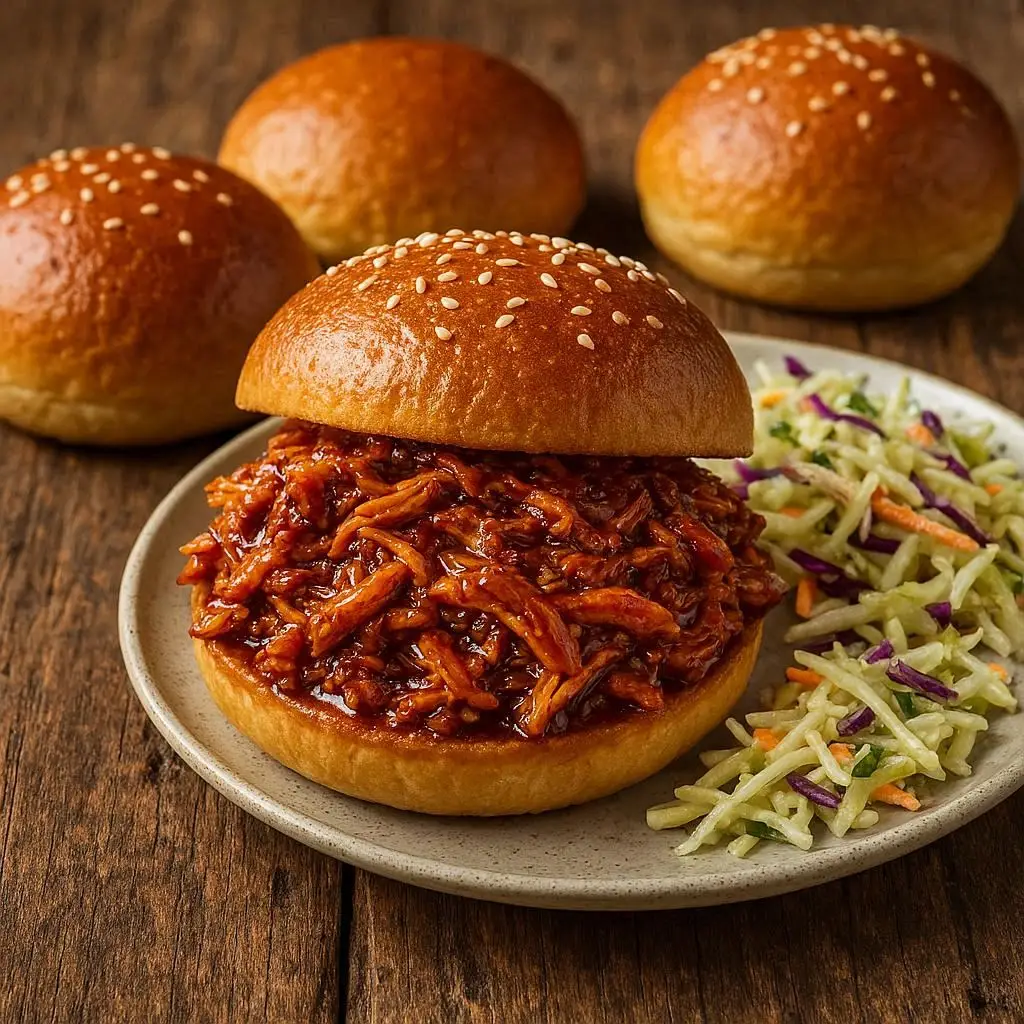
Use soupspoon to evenly divide shredded chicken between hamburger buns. Serve.
Decide your grilling method depending on the food you plan to cook.
Direct grilling works best for tender, thin, or small foods that cook in 30 minutes or less, like burgers, steaks, chops, chicken pieces, sausages, and vegetables. Simply place the food on the grill rack directly over the heat source, with the lid open or closed depending on the grill instructions. To ensure even cooking, turn the food only once during the grilling process.
Indirect Grilling Indirect grilling is perfect for large cuts of meat, ribs, whole birds, or fish. It involves placing the food on the grill rack away from or to the side of the heat source, with the grill lid closed. The heat circulates inside, reflecting off the lid and interior surfaces to cook the food evenly from all sides, so there’s no need to flip it.
Get Fired Up! Setting up your grill is simple, whether you’re using charcoal or gas.
For a charcoal grill, start by preparing the fire. About 25 to 30 minutes before cooking, take off the grill cover, open all the vents, and arrange the briquettes on the lower charcoal grate. For direct cooking, spread enough briquettes to create a single layer covering the charcoal grate. Then, stack these briquettes into a pyramid shape at the center of the grate. For indirect cooking, the number of briquettes you need to use is based on your grill size.
Grill Diameter in inches
Briquettes needed on each side to start
Briquettes to add per side for longer grilling
26 3/4
30
9
22 1/2
25
8
18 1/2
16
5
Apply a fire starter, use an electric starter, or place briquettes in a chimney starter. If using liquid starter, wait one minute before lighting the fire. Let the fire burn for 30 to 35 minutes or until the coals are covered with a light layer of gray ash. Using long-handled tongs, arrange the coals according to your chosen cooking method. For direct cooking, evenly distribute the coals across the grill’s bottom, ensuring they cover an area at least 3 inches larger on all sides than the food being cooked. For indirect cooking, push the coals to one side of the grill and set the drip pan on the opposite side. Alternatively, place the drip pan in the center and divide the coals into two equal piles on either side. Put the grill rack in place and confirm the cooking temperature.
For a gas grill: Open the lid. Turn the gas valve “on” and turn burners on high. Ignite as directed by the manufacturer. Close the lid and preheat the grill (usually with all burners on high for 10 to 15 minutes). For indirect cooking method, turn off the burners directly below the food. Adjust the burner controls to the temperature needed for cooking.
Hand Check
To judge how hot your grill is, carefully place the palm of your hand just above the grill rack and count the number of seconds you can hold it in that position.
Time
Thermometer
Temperature
Visual
2 seconds
400°F to 450°F
Hot (high)
Coals glowing and lightly covered with gray ash
3 seconds
375°F to 400°F
Medium-high
4 seconds
350°F to 375°F
Medium
Coals glowing through a layer of ash
5 seconds
325°F to 350°F
Medium-low
6 seconds
300°F to 325°F
Low
Coals burning down and covered with a thick layer of ash
Hot or Not? Coals are ready for grilling when they are covered with gray ash, typically after 25 to 30 minutes. To check the temperature of the coals, use a built-in or separate flat grill thermometer. Or carefully place the palm of your hand above the grill rack at cooking level and count the number of seconds you can hold it there. For example, “One, I love grilling; two, I love grilling,” and so on.
Then consult the chart above. When grilling indirectly, hot coals will provide medium-hot heat and medium-hot coals will provide medium heat.
Adjusting the Heat
If the coals are too hot, raise the grill rack, spread the coals apart, close the air vents halfway, or remove some briquettes.
For a gas or electric grill, adjust the burner to a lower setting.
If the coals are too cool, use long-handled tongs to tap ashes off the burning coals, move the coals together, add briquettes, lower the rack, or open the vents.
For a gas or electric grill, adjust the burner to a higher setting.
Not everyone judges the temperature of coals alike. For perfectly done food, use the timings as a guide and watch all foods on the grill closely.
SAFETY FIRST
Allow coals to burn completely and let the ashes cool for 24 hours before disposing of them. Let your grill cool completely before covering or storing it.
Use charcoal or gas ‘grills outside only- never in a garage, porch, or enclosed area.
Periodically test your gas grill for leaks and clean the venturi tubes regularly according to the manufacturer’s directions.
Don’t use lighter fluid, an electric starter, or a chimney starter with instant-lighting briquettes.
Never leave a grill unattended or try to move it while it’s in use or hot.
Controlling Flare-Ups
Fat and meat juices dripping onto hot coals can cause flare-ups, small flames that might char your meat. To manage flare-ups, try raising the grill rack, covering the grill, spacing the hot coals further apart, or removing a few coals. If needed, take the food off the grill and spray the fire with water from a bottle. Once the flames subside, return the food to the grill.
To prevent flare-ups on a gas grill, burn off residue by setting the grill to high for 10–15 minutes with the lid closed after each use. When it cools, clean the grill rack with a brass-bristle brush to remove baked-on food.